
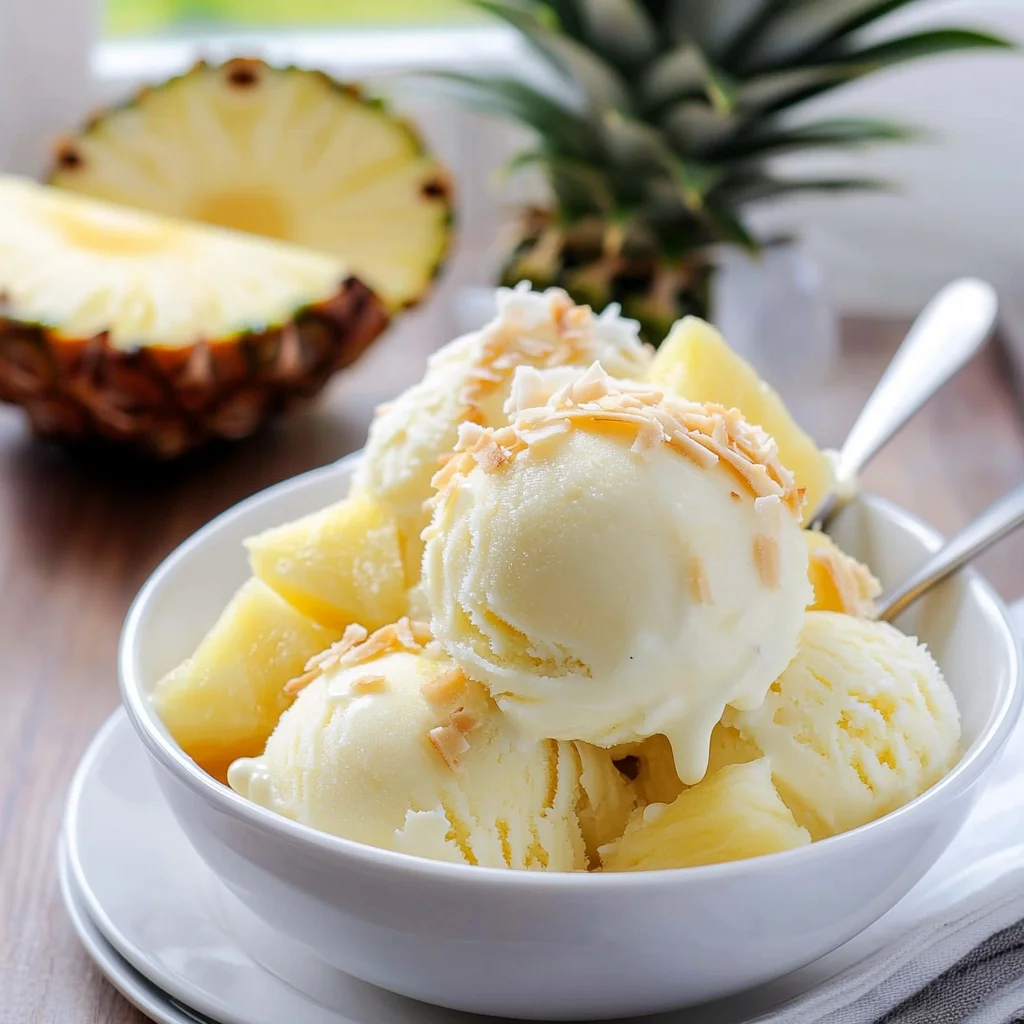
Imagine sinking your spoon into a bowl of Pineapple Coconut Ice Cream, where the sweet tang of fresh pineapple dances playfully with the velvety richness of coconut milk. Each bite evokes sun-soaked beach days and lazy afternoons, transporting you to an island paradise with its tropical flavors, creamy texture, and a hint of coconut that lingers like a warm breeze.
This delightful treat isn’t just an indulgence; it’s a cherished memory waiting to happen. Picture yourself serving it at summer gatherings or cozy family barbecues, where laughter fills the air and everyone is craving something refreshing. As you scoop out this dreamy ice cream, you’ll be met with smiles and requests for seconds, making every moment sweeter than the last.
Why Does Everyone Love Pineapple Coconut Ice Cream?
Creamy goodness: With full-fat coconut milk, this ice cream is irresistibly smooth and rich.
Tropical flair: Fresh pineapple adds a burst of flavor that transports you to paradise with each scoop.
Simple ingredients: Just five pantry staples make it easy to whip up this delightful treat in no time.
Versatile delight: Serve it alone, blend it into smoothies, or use it as a topping for your favorite desserts.
Sweet satisfaction: Adjust the sugar to your taste, ensuring every bite is perfectly sweetened just for you!
Pineapple Coconut Ice Cream Ingredients
- 2 cups coconut milk (full-fat for creaminess) – This rich base adds a luscious texture to your Pineapple Coconut Ice Cream.
- 1 cup fresh pineapple (diced) – Fresh pineapple brings a vibrant sweetness and tropical flavor that perfectly complements the coconut.
- 1/2 cup sugar (adjust to taste) – Sweeten to your liking, balancing the natural tartness of the pineapple for a delightful treat.
- 1 teaspoon vanilla extract – A touch of vanilla enhances the overall flavor, making your ice cream even more irresistible.
- 1/4 teaspoon salt – A pinch of salt elevates the sweetness and rounds out all the flavors beautifully.
Step-by-Step Pineapple Coconut Ice Cream

1. Blend: In a blender, combine 2 cups of full-fat coconut milk, 1 cup of diced fresh pineapple, 1/2 cup of sugar, 1 teaspoon of vanilla extract, and 1/4 teaspoon of salt. Blend until smooth and creamy—this creates your luscious ice cream base.
2. Chill: Pour the blended mixture into a mixing bowl and refrigerate for at least 2 hours until it’s thoroughly chilled. This step is crucial for achieving that perfect texture in your Pineapple Coconut Ice Cream.
3. Churn: Once the mixture is chilled, pour it into an ice cream maker. Churn according to the manufacturer’s instructions until you have a soft, fluffy consistency—usually about 20-30 minutes.
4. Firm Up: Transfer your churned ice cream to an airtight container and freeze for at least 2 hours to firm up nicely. This final step will ensure your treat is scoopable and deliciously refreshing.
Optional: Top with toasted coconut flakes for an extra tropical crunch!
Exact quantities are listed in the recipe card below.
Expert Tips
- Coconut Milk Choice: Use full-fat coconut milk for a rich and creamy texture in your Pineapple Coconut Ice Cream. Low-fat versions may result in a watery consistency.
- Pineapple Freshness: Opt for ripe, fresh pineapple to enhance the sweetness and flavor. Canned pineapple may alter the taste and texture of your ice cream.
- Sugar Adjustments: Taste your mixture before freezing; adjust sugar based on the natural sweetness of the pineapple. This helps avoid overly sweet or bland ice cream.
- Chilling Time: Don’t skip the chilling step! Refrigerating your mixture for at least 2 hours ensures a smoother churn and better final texture.
- Proper Freezing: Allow enough time for the churned ice cream to firm up in the freezer. Insufficient freezing can lead to a soft, scoopable mess instead of delightful Pineapple Coconut Ice Cream.
How to Store and Freeze Pineapple Coconut Ice Cream
- Freezer: Store your Pineapple Coconut Ice Cream in an airtight container for up to 2 weeks. This will keep it creamy and prevent ice crystals from forming.
- Fridge: If you have leftover mixture before churning, keep it covered in the fridge for up to 3 days. Just give it a good stir before using.
- Serving: Let the ice cream sit at room temperature for about 5-10 minutes before scooping for easier serving. Enjoy that creamy goodness!
Pineapple Coconut Ice Cream Your Way
Get ready to elevate your tropical treat with these delightful twists that bring out even more flavor and fun!
- Dairy-Free: Swap coconut milk for almond or cashew milk for a lighter, nutty flavor. This will also create a unique creamy texture, making it a great option for those avoiding dairy.
- Extra Fruity: Add 1/2 cup of mango or passion fruit puree for a vibrant taste explosion. The additional fruit not only enhances the tropical vibe but also provides a lovely color contrast in your ice cream.
- Chocolate Lovers: Stir in 1/4 cup of cocoa powder for a rich chocolate twist. This unexpected combination creates a deliciously indulgent dessert that satisfies both pineapple and chocolate cravings.
- Spicy Kick: Incorporate 1/2 teaspoon of cayenne pepper or ginger for a surprising heat. The spice complements the sweetness of the pineapple beautifully, giving your ice cream an exciting zing.
- Crunch Factor: Mix in 1/2 cup of toasted coconut flakes or macadamia nuts for added texture. The crunch offers a delightful contrast to the creaminess, making each bite an adventure.
- Herbal Infusion: Add 1 tablespoon of fresh mint or basil leaves for a refreshing herbal note. This subtle addition lifts the flavors and gives your ice cream an unexpected twist that’s perfect for summer parties.
- Sugar Substitution: Use honey or maple syrup instead of sugar to sweeten naturally. These alternatives not only add depth to the flavor but also create a smoother consistency in your ice cream.
Make Ahead Options

Preparing Pineapple Coconut Ice Cream is a breeze, making it an ideal choice for meal prep enthusiasts looking to enjoy a refreshing dessert at any time. You can easily prep the ice cream base in advance by combining 2 cups of full-fat coconut milk, 1 cup of diced fresh pineapple, 1/2 cup of sugar, 1 teaspoon of vanilla extract, and 1/4 teaspoon of salt in your blender. Once blended until smooth, simply refrigerate the mixture for at least 2 hours or even up to 3 days to maintain its freshness. When you’re ready to churn, just pour the chilled mixture into your ice cream maker and follow the manufacturer’s instructions. After churning, transfer the luscious Pineapple Coconut Ice Cream to an airtight container and freeze for at least another 2 hours before serving. This way, you’ll have a creamy tropical treat that’s ready whenever those sweet cravings strike!
Pineapple Coconut Ice Cream Questions Answered
Can I use low-fat coconut milk instead of full-fat?
While you can use low-fat coconut milk, opting for full-fat coconut milk will give your Pineapple Coconut Ice Cream that rich, creamy texture we all love. The full-fat version adds a luscious mouthfeel, making each scoop wonderfully indulgent.
What if I can’t find fresh pineapple?
If fresh pineapple isn’t available, you can substitute it with canned pineapple in juice (not syrup) or even frozen pineapple chunks. Just ensure you drain any excess liquid from canned options before blending to maintain the right consistency and flavor in your ice cream.
How should I store leftover Pineapple Coconut Ice Cream?
To keep your ice cream fresh and delicious, transfer it to an airtight container after churning. It’s best enjoyed within a week, but it can last up to two weeks in the freezer—just remember to let it sit at room temperature for a few minutes before scooping for easier serving!
Is there a way to make this recipe dairy-free?
Absolutely! This recipe is already dairy-free thanks to the use of coconut milk. If you’re looking for additional flavor variations, consider adding a splash of rum extract or a handful of shredded coconut for extra tropical flair without compromising dietary needs.
How long does it take to freeze properly?
After churning, allow your Pineapple Coconut Ice Cream to freeze in an airtight container for at least 2 hours. This will give it time to firm up nicely so you can enjoy perfectly scoopable ice cream. For best results, aim for 4 hours or longer if you prefer it extra solid!
What serving size is recommended for this recipe?
This recipe yields about 4 servings, with each serving containing approximately 250 calories. It’s perfect for sharing on a warm day or enjoying as a special treat during family gatherings. Feel free to adjust the serving size based on your needs!
Pineapple Coconut Ice Cream
Ingredients
Method
- In a blender, combine coconut milk, diced pineapple, sugar, vanilla extract, and salt. Blend until smooth.
- Pour the mixture into a mixing bowl and refrigerate for at least 2 hours until chilled.
- Once chilled, pour the mixture into an ice cream maker and churn according to the manufacturer's instructions.
- Transfer the churned ice cream to an airtight container and freeze for at least 2 hours to firm up.