
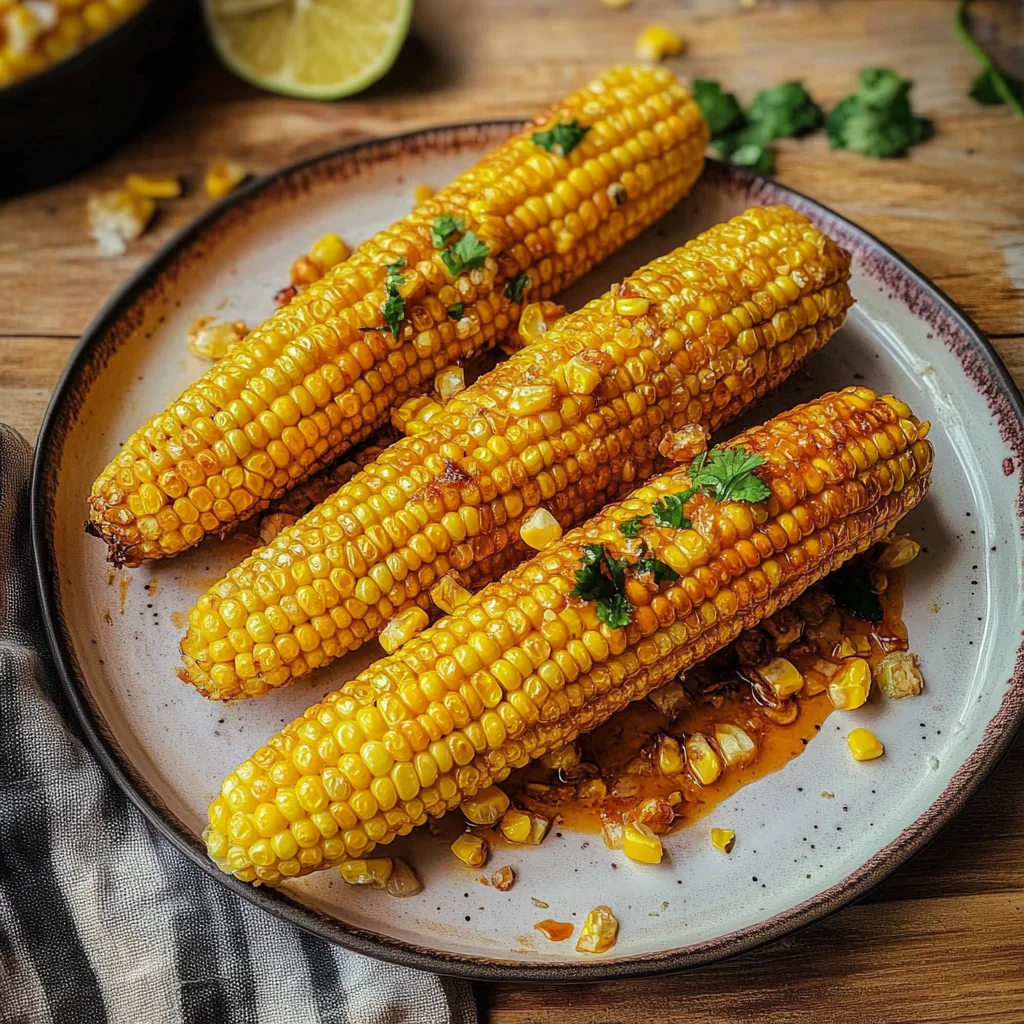
Picture this: golden ears of corn, glistening under the summer sun, bursting with sweet juiciness and a hint of smoky goodness. Baked corn on the cob is not just a dish; it’s a celebration of flavors that dance on your palate, leaving you craving more with every buttery bite. Imagine the soft, tender kernels popping in your mouth, releasing their delightful aroma as they mingle with spices and herbs, creating an irresistible sensory experience that makes you feel like you’re at a sunny backyard barbecue.
I still remember the first time I tried baked corn on the cob at my friend’s summer party—it felt like a warm hug from the inside! As we gathered around the grill, laughter filled the air while those golden beauties roasted to perfection. Whether it’s for a family gathering or simply to elevate your weeknight dinner, this dish promises to bring people together, making every occasion just a little bit brighter and tastier. Ready to indulge in an unforgettable flavor explosion?
Why Is baked corn on the cob So Irresistibly Good?
Freshness shines through with every bite of this delicious baked corn on the cob, ensuring a sweet and juicy experience. Simple prep makes it a breeze—just husk, clean, and coat with butter! Flavorful seasoning elevates your dish; try adding paprika for a hint of spice. Versatile enough to pair with any meal, this crowd-pleaser is perfect for summer barbecues or family dinners. Best of all, it takes just 30 minutes from start to finish!
Ingredients for baked corn on the cob
- For the Corn
4 ears fresh corn on the cob (Husked and cleaned) – Fresh corn is essential for that sweet, juicy flavor that makes baked corn on the cob irresistible.
- For the Butter and Seasoning
4 tablespoons butter (Melted) – Melted butter adds richness and helps the seasonings adhere beautifully to the corn.
1 teaspoon salt (To taste) – A touch of salt enhances all the natural sweetness of the corn.
1 teaspoon black pepper (To taste) – Black pepper adds a subtle kick, balancing the sweetness perfectly.
1 teaspoon paprika (Optional) – Paprika brings a warm color and a hint of smokiness, elevating your baked corn on the cob experience.
How to Make baked corn on the cob

1. Preheat the oven to 400°F (200°C). This ensures your baked corn on the cob will cook evenly, resulting in tender, juicy kernels bursting with flavor.
2. Husk the corn and remove all silk. Gently peel back the green husk and pull off those pesky silks to reveal the fresh, golden ears of corn waiting for their moment in the oven.
3. Wrap each ear of corn in aluminum foil. This helps to lock in moisture while baking, so your corn cooks perfectly and remains succulent throughout.
4. Place the wrapped corn on a baking sheet. This makes it easy to transport in and out of the oven while keeping your kitchen tidy during this delicious endeavor.
5. Bake in the preheated oven for 30 minutes. Enjoy the wonderful aroma that fills your kitchen as the corn bakes to perfection—golden and tender!
6. Carefully unwrap the corn, and brush with melted butter. Season with salt, pepper, and paprika if desired for an extra kick! The melting butter enhances every bite with richness and depth.
Optional: Garnish with fresh herbs for a delightful twist!
Exact quantities are listed in the recipe card below.
Tips for the Best baked corn on the cob
- Fresh Corn Matters: Always choose the freshest corn available; it enhances sweetness and flavor, making your baked corn on the cob irresistible.
- Thoroughly Husk: Ensure all silk is removed from the corn. Any leftover silk can burn during baking, affecting the taste.
- Foil Wrapping: Wrap each ear of corn securely in aluminum foil to trap steam. This keeps your corn juicy and tender while baking.
- Butter Timing: Brush melted butter on only after baking. Adding it too early can lead to burnt butter flavors, ruining your baked corn on the cob.
- Season Generously: Don’t skimp on salt and pepper. These enhance the natural sweetness of the corn, making every bite delightful.
How to Store and Freeze baked corn on the cob
- Room Temperature: Enjoy baked corn on the cob right away for the best flavor. If left out, consume within 2 hours to ensure freshness.
- Fridge: Store leftover baked corn on the cob in an airtight container or tightly wrapped in foil for up to 3 days. This helps maintain moisture and flavor.
- Freezer: For longer storage, wrap cooled baked corn on the cob tightly in plastic wrap and then aluminum foil. It can be frozen for up to 3 months.
- Reheating: To reheat, place the corn in a preheated oven at 350°F (175°C) for about 10–15 minutes or microwave it for 1–2 minutes until heated through.
Make baked corn on the cob Your Own
Feel free to let your creativity shine as you customize this delightful dish to suit your taste!
- Herbed Butter: Mix in fresh herbs like cilantro or basil for an aromatic kick. The addition of herbs elevates the corn, creating a fragrant and memorable side dish that complements summer meals perfectly.
- Cheesy Delight: Sprinkle grated Parmesan or cotija cheese over the melted butter for a savory twist. This adds a rich, creamy texture and an irresistible umami flavor that will have everyone coming back for seconds.
- Spicy Kick: Add a dash of cayenne pepper or chili powder to the melted butter for an exciting heat. The spice level can be adjusted based on your preference, making it a zesty treat for those who love a little fire in their food.
- Sweet Touch: Drizzle honey or maple syrup over the corn before baking for a touch of sweetness. This unexpected pairing creates a delightful contrast to the savory elements, making each bite a delicious surprise.
- Lime Zest: Grate some lime zest into your butter mixture for a refreshing citrus pop. The bright flavor not only enhances the corn but also brings a vibrant summer feel to your table.
- Bacon Bliss: Top with crispy bacon bits after baking for a smoky crunch. The salty, savory bacon adds depth and richness, turning ordinary corn into an extraordinary side dish.
- Garlic Infusion: Stir minced garlic into the melted butter for an aromatic flair. This classic addition transforms the flavor profile, making it perfect for garlic lovers who crave bold tastes.
- Asian Flair: Brush with sesame oil and sprinkle with sesame seeds or scallions before serving. This unique twist introduces new flavors that are both nutty and fresh, offering an exciting departure from traditional preparations.
Make Ahead Options

This baked corn on the cob recipe is a delightful option for meal prep, making it easy to enjoy sweet, juicy corn anytime you desire. You can husk and clean the corn up to 24 hours in advance, then wrap each ear in aluminum foil, ready for baking. Additionally, you can melt the butter and mix in salt, pepper, and paprika ahead of time; just store the seasoning mixture in an airtight container in the fridge for up to 3 days. When it’s time to serve, simply preheat your oven to 400°F (200°C), place the prepared corn on a baking sheet, and bake for about 30 minutes. Once done, unwrap and brush with your seasoned butter for that perfect finishing touch. This way, you’ll save time without sacrificing flavor!
baked corn on the cob Recipe FAQs
What type of corn should I use for baked corn on the cob?
Fresh, sweet corn is ideal for this recipe! Look for ears that are bright green and tightly wrapped in husks. The kernels should be plump and milky when you press them gently. Using fresh corn ensures a juicy, flavorful side dish, perfect for summer barbecues.
Can I add more seasonings to my baked corn on the cob?
Absolutely! While salt, pepper, and paprika create a delightful flavor profile, feel free to get creative. Consider adding garlic powder, parmesan cheese, or even a squeeze of lime juice after baking for an extra zing. The beauty of this recipe lies in its versatility!
How do I store leftover baked corn on the cob?
If you have any leftovers (though it’s hard not to devour the whole batch!), let the corn cool completely before wrapping it tightly in plastic wrap or aluminum foil. Store it in the refrigerator for up to 3 days. Reheat in the oven at 350°F (175°C) for about 10 minutes to bring back that fresh-baked taste.
Can I freeze baked corn on the cob?
Yes, you can freeze cooked corn on the cob! After letting it cool entirely, wrap each ear in plastic wrap and then aluminum foil to protect against freezer burn. It can be stored for up to 3 months. When you’re ready to enjoy it again, thaw it overnight in the fridge and reheat as desired.
What if my corn isn’t fully cooked after 30 minutes?
If your corn isn’t tender after baking for 30 minutes, don’t worry! Simply rewrap it in foil and return it to the oven for an additional 5-10 minutes. Each oven is different, so keep an eye out until those kernels are perfectly soft and juicy!
Is this recipe suitable for dietary restrictions?
This baked corn on the cob recipe is naturally gluten-free and vegetarian-friendly! If you’re looking to make it dairy-free, simply substitute butter with olive oil or a plant-based butter alternative. Adjusting seasonings can also accommodate various dietary preferences while keeping that delicious taste intact!